

There's No Place Like Home

When I was a kid, my daily homework routine always started with cleaning my room. I found that any clutter in my space was just too distracting. Once everything was in it’s place and orderly, then I could calm my mind and focus on work. That pattern has evolved for me over the decades, but the central truth has remained: when my world is ready, I’m ready to create.
When my wife Julie and I bought our house three years ago, we knew that we were biting off a big hunk of work. In our previous homes, we’ve remodeled kitchens, bathrooms and the occasional bedroom, but a top-to-bottom major renovation was a new challenge for us. Since Julie is the breadwinner in our family, (a fact I am eternally grateful for), the task of turning the big 1923 Tudor Revival house into a modern home was on me. I’ve steadily accumulated a collection of skills and tools over the years that serve to make me fairly handy, but I’m not those guys on This Old House. So the prospect of hiring and managing contractors (almost all of whom are ruthless crooks, I suspect), and doing as much of the work myself as possible was daunting to say the least. We’ve been plugging away at the house for years and it is nearly finished. This house is far and away the most humbling, frustrating and depressing thing I’ve ever taken on. It’s also a source of incredible pride for me. I am still that kid who needs things to be just so.
I deliberately kept my office for last, as it’s just for me. I wanted it to be just so.
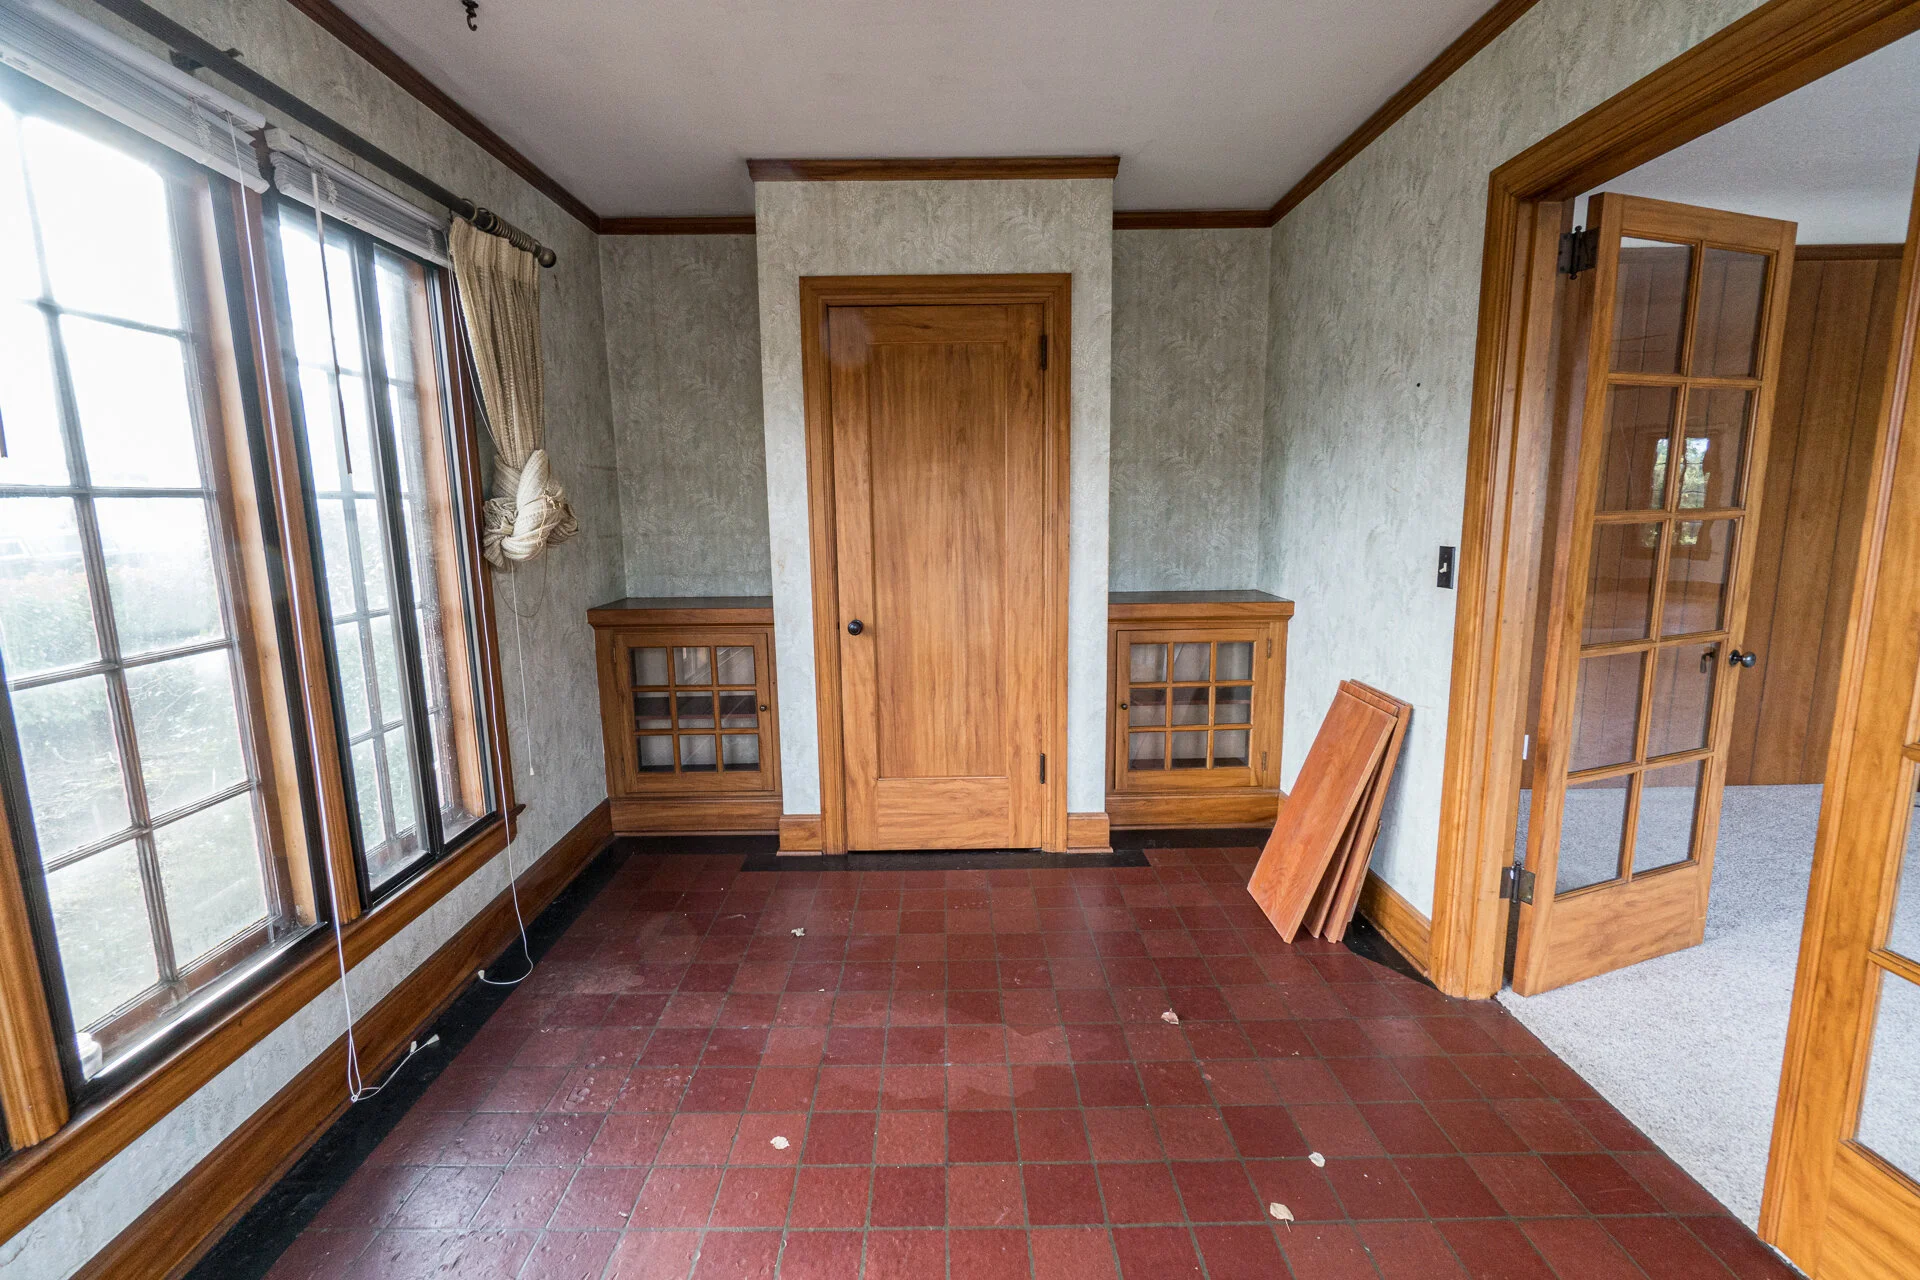
When we bought the house, the room that would become my office was a retched mess of layered wallpaper over damaged plaster and a floor that was as much glue as anything else.

The room’s potential was obvious, with massive windows and french doors opening to the living room. The office sits on the front corner of the house, which itself is on a corner. It’s a fish bowl.
Let’s talk about the room in question. I’ve been told that when the house was built for a Doctor and his family, he had the small space constructed in the front corner of the main level of the house to serve as a home office for his practice. The idea proved short-sighted in our tight-knit neighborhood when patients, concerned about their privacy, asked to be seen in the kitchen. I’ve also heard that the owner wasn’t a physician, but a dentist and that his patients did not appreciate the large windows and the prying eyes of passers by. We found the room drafty with the french doors that opened to a small porch, so we pulled them and built in a window instead. We replaced all of the windows in the house at the same time.
Another relic of the original office was the sink in the closet, which went away when we re-plumbed the house. The only things you can see in these two “before” shots that have found homes in the new office are the french doors leading out to the living room, the closet door, and the original baseboard and crown moldings, which are made from Gumwood. More on that later.

After the exterior french doors were removed and replaced with a window, the large 4-part window was pulled and replaced with a new version. You can also see in this photo that the first layers of wallpaper and flooring have been peeled off.
Before we moved into the house, we replaced the windows and did other large structural work. Amidst this messy period, I worked to remove the layers of wallpaper and glued on flooring in the office space. The first layers came off easy in big chunks, but the final layer was stubborn and I had to use a power scraper to get down to the bare plaster. Where the contractors put in drywall to fill the void below the new front window, I had to blend the old plaster to the profile of the drywall. Lesson learned: drywall contractors do not care about the work of other contractors. In fact, I found with only a couple of exceptions, the contractors we have hired have held no regard whatsoever for the work of anyone else. So in the case of the drywall, it was not flush with the plane of the front wall, so they laid down wide swaths of joint compound to hide this fact. In the photo above you can see the light-colored mud around the window. This detail cost me many hours of work later as I had to build up the wall to meet the new drywall.
So with the wallpaper removed to the bare plaster, I then had to coat the plaster with a shellac-based primer which served to seal the old plaster and keep it from galling apart when I moved to the next step. To smooth the cracked and chipped walls, (and bring up the profile of the front wall), I spread a thick layer of joint compound, which I then sanded smooth. Over that I rolled on a gooey layer of watered-down joint compound which I applied large strips of fiberglass felt onto. With the fiberglass stuck to the mud, I troweled it smooth and then layered another generous coat of mud to hide the fiberglass weave. These steps left me with smooth walls, which I then primed.
For the floor, I was able to peel up the thick marmoleum which was glued down to a layer of felt, which was glued to the fir flooring beneath. At some point in the past, the furnace vent was relocated in the room and the old locations filled with plywood. The large air intake in the corner had also been disconnected, so I removed it and filled that gap with plywood. Since the original flooring was in no condition to be refinished, I opted to install a new oak floor, which meant I had to pry up the old floor. With the walls and floor up to snuff, I turned to the closet and window trim.
Our new windows were not the same size as the old ones, so the original gumwood trim wouldn’t work on the new windows. It took me a year to find a local source of gumwood, which comes from Sweet Gum trees, a type of Eucalyptus. I had to mill down the Sweet Gum planks to make new trim, which involved numerous passes through a planer, bandsaw, router and table saw. In the end, I had a decent reproduction of the original trim. The windows in the office were finished out in pine, which looks nothing like gumwood. I tried about 10 different stains in an attempt to match the color of gumwood, but nothing looked right, so I opted to stain the window frames black and natural oil on the gumwood. The baseboards and crown moldings in the room had a layer of thick nasty shellac, which I had to strip off to reveal the gorgeous wood underneath. The closet door got the same treatment.

The original gumwood door shines with a new coat of finish. The cabinets on each side of the closet became chests of drawers.
One of the wonderful elements of the office is the symmetry of the space. The room is 9 feet wide by 14 feet deep with the front window on one end and the closet on the other. The closet protrudes into the room, leaving two identical coves. The home’s builder created two small cabinets from gumwood, which I kept. Instead of the glass doors, however, I made a set of drawers for each cabinet. I’ve found that drawers are vital to an office space, scratching my itch for organization. I crafted the drawers from Baltic Birch plywood, but I needed gunwood to make the fronts. Since I had a lot of the old window trip piled up in the basement, I brought them up, pulled out the nails and then planed them down into ½-inch thick boards which I glued together to made a large slab. That slab became four drawer fronts. I love how they came out. I left the nail holes unfilled to highlight the repurposing of the wood.

Old friends. My workhorse camera from my days as a photojournalist sits in a place of honor alongside some of my books.
Above each of the cabinets I built shelves, which I faced with more of the repurposed gumwood trim. Having all of my beloved books in boxes for over three years has been hard. Numerous times I needed to find something in one of the books, which lead to digging through boxes in the basement and much frustration. In fact, I don’t think I’m overstating things when I say that having my books and other personal gear squirreled away in the basement lead me into mild depression. I’m not minimizing the real struggle that depression brings to so many people. I have been struggling myself for some time with a lack of purpose and deep frustration over not having things in order. There have been many, many times where I have spent hours looking for something I needed, only to end up feeling defeated when I couldn’t put my hands on it. As I was building the shelves to fill the spaces alongside the closet in my office, I could feel genuine excitement and relief that soon my books and other thing special to me would be organized and accessible. From a state of uncertainty to a place of order and certainty. After I installed the shelves, I raced to basement and brought up box after box of books, each one filled with memories of things learned, adventures researched, and stories told. It felt like welcoming home old friends.

My books are precious to me, and it’s taken me decades to gather them all and read their pages. I’ve always loved non-fiction books and authors like Bill Bryson have taught me so much. I am so honored to have friends who have written books and their works can be found in my library. In this photo are books from four friends, as well a a few I’ve provided photos for.
Before I move along, I’d like to talk about the color of my office. When we painted many of the rooms in our house, we opted for various shades of grey, which serves as a sort of canvas for the colorful things we have collected. In my office, I wanted the space to be deep and dark with color that would help me stay stimulated and soothed. With all of the windows and the french doors leading to the living room, light spills into the room from three sides so the darkness of the paint doesn’t leave the room feeling gloomy. On the contrary, the deep Sapphire blue I chose is directly across the color wheel from the warm orange tone of the gumwood. As someone who appreciates the power of color, I wanted my space to calm me and help me stay centered and creative. The blue nails it.

Gone is the sink! My closet is my second desk, where my camera gear and bags are staged for use. I’ve thought through every detail of the closet from the charging stations on the top shelf to the bag hanging rails on the door. Everything is in its place.
Anyone who knows me will tell you that I love bags. The ways we organize and carry our tools and toys are immensely important and I have a large collection of various backpacks, duffels, pouches and cases for carrying my junk. The main workhorses of my “fleet” can be found in the closet along with my camera gear. I’ve learned through years of trial and error that there is no such thing as the perfect camera bag. Instead, there are bags that are perfect for various activities. On my closet door I fastened gumwood rails what hold ‘S’ hooks that hold my empty packs that I use most often. In the bottom section of the closet you can find my larger, dedicated camera backpack and two sling bags I also use often. Also there is a box filled with assorted pouches that can be grabbed and stuffed with anything my heart desires.
The top shelf of the closet is empty and open. It’s a great height to use as a standing desk where I can assemble cameras, clean my gear and pack bags. To the right of the top shelf is a small medicine cabinet (one of the original items I kept from the Doctor/Dentist office). In that cabinet are cleaning tools, small camera accessories and tools. Above the top shelf are two small shelves I made. The top one is alongside an outlet I wired in. That shelf hold chargers and items that need frequent charging like camera and drone batteries, battery packs, gimbals and action cameras and lights. The shelf below holds my three camera bodies and smaller lenses. My large 100-400 zoom lens is clamped to the underside of the shelf with an Arca-Swiss clamp that locks down on the lens’ foot.
The shelf below the “work” shelf is storage for the various other items I use all the time like my drone case, tripod and other stabilizers, electronic cords, and all manner of other must-have photo gizmos. I also have my two Peak Design camera cubes there, which I can grab quickly and fill with the gear above and stuff into the packs below or on the door.
When not in use, everything is safely tucked away behind that gorgeous gumwood door.

I’ll write up a post sometime about my various bags, but these two beauties are from a great little company in Montana called Evergoods. This pack is their CHZ26 in limited edition Signal Blue. This is the best day pack I’ve ever seen and I am over the moon for the color. I can put a small camera cube along with snacks, extra clothing and my ipad or laptop. It’s simple elegance in a bag. The one hanging below is their MPL30, which is the best day hiking bag I’ve seen. Again, it’ll hold plenty of camera gear along with the things I need for a day of hiking and exploring with my family. That Signal Blue color… it pops. Next to the MPL30 is the Mystery Ranch DSLR pack which holds my Sony A7RIV and lens. I usually attach it to the straps on the pack I choose and carry it on my chest, where I can grab it quick.
So I’ve put all of my books and bags and camera gear in its place, but what about my workspace? For three years I’ve used a variety of spaces for my iMac and hard drives. Many months they lived in boxes in the basement, but when I needed them I’d set them up on the dining room table, my wife’s desk, or a small standing desk in the corner of our kitchen. All of these options were awful for various reasons.
I like having a large space where I can spread out maps, books and gear as I plan a workshop or adventure. I knew when I began planning my office that I’d place a large desk at the end of the room beneath the front window. With nine feet of width there, I set out to build an 8-foot table to serve as my workspace.
When we demolished the old kitchen in the house, I tore out a couple of the walls. When they built houses in 1923 Portland, they framed them in beefy 2x4’s hewn from old-growth fir trees. The studs I carefully pulled from the kitchen walls were stunning ancient trees with tight grain and hard fibers. The studs you find today usually have 10 growth rings across their 3 ½ inch width. The old-growth 2x4’s I salvaged have four or more times that many rings. The trees cut down to make these boards grew for centuries, all the while competing for sunlight and nutrients. This means they grew slow and strong for upwards of 500 years before becoming wall studs.

Hundreds of years of history in my desk’s top. These boards were growing before America was America.
With a hefty pile of old 2x4’s in my garage, I spent hours pulling nails. When we took down the rickety old patio roof, I kept the beam that supported it. All of these amazing boards looked like garbage until I ran them through the planer and shaved off the layers of dirt and wear to reveal the splendid wood inside.
The beam became four legs, beefy and strong. The studs became the understructure and the finest of them were joined together into a 3 foot wide by 8 foot long slab that once I sanded the hell out of them became a silky-smooth desk top. I rubbed oils and waxes into the wood. My shoulders and back screamed. I buffed and rubbed more.
Now I have my massive desk with plenty of room for my computer, hard drives and even my Lego Statue of Liberty model. It’s one of my best creations, (the desk, not the model).

Eight feet of stunning old-growth fir, salvaged from our home.

I’m home!
Now that my office is finally complete, and I have a comfortable place to sit and think and create, I feel more settled. Like the fifth-grade me, I feel ready to take on the work before me. Now if you don’t mind, I have an online class to design for Road Scholar. More on that in the next post.